Lesson 3: Notion for Beginners
Advanced Notion Training: Mastering Databases
Welcome to our advanced Notion training session. In this guide, we’ll dive into the intricate details of using databases in Notion. We’ll explore what databases are, how to create and customize them, and the variety of workflows they can support. By the end of this guide, you’ll have a comprehensive understanding of how to leverage Notion’s databases to enhance your productivity and organization.
What is a Database in Notion?
A database in Notion is a type of page designed to store information in a structured and accessible manner. Databases in Notion are incredibly flexible, allowing you to manage everything from project plans and task lists to customer information and content calendars. Each entry in a database is its own page, which can contain text, images, subpages, and other databases.
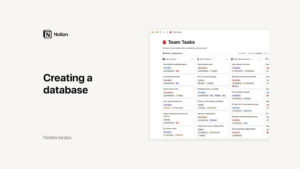
Creating a Database from Scratch
Creating a database in Notion is straightforward. Here’s how you can do it:
Creating a Table Database:
Click on the plus button and select “Table” from the database options.
A new page is created. You can name it, add an icon, and start entering data in the first column.
Adding Entries:
Each entry in the database is a separate page. Hover over an entry and click “Open” to access and edit its content.
Use this page like any other Notion page to add text, images, subpages, and more.
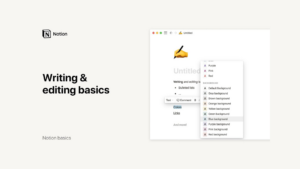
Using Properties:
Properties are pieces of information about each entry. For example, if your entries are tasks, properties might include due dates, owners, and statuses.
Add various property types such as numbers, single-select menus, multi-select menus, dates, and people.
Customizing Properties:
Click “Add a property,” name it, and select its type. For instance, add a date property for deadlines or a person property to assign tasks.
Fill in properties by clicking on the field. For date properties, a date picker will appear; for person properties, you can type and tag team members.
Database Views
Notion allows you to view databases in multiple ways, making it easier to digest and interact with your data. Here’s how to create and customize different views:
Adding a New View:
Click “Add a view” at the top left of your database.
Select the type of view you want (e.g., Board, Calendar, List, Gallery) and give it a name.
Board View:
Useful for visualizing workflow stages. For example, in a project database, you can group tasks by status (e.g., To Do, In Progress, Done).
Add a board view and group by the status property to see tasks move through stages.
Filtered Views:
Create views that show only certain types of data. For instance, filter a task database to display only high-priority tasks.
Add a filter by clicking “Filter,” selecting the property, and setting the criteria (e.g., Priority is High).
Sorted Views:
Sort data in a database to prioritize information. For example, sort tasks by deadline to see the most urgent ones first.
Add a sort by clicking “Sort,” selecting the property, and choosing the order (e.g., Date is ascending).
Toggling Properties:
Customize which properties are visible in each view. Click “Properties” and toggle properties on or off.
This helps to focus on relevant data while hiding unnecessary details.
Database Templates
Database templates are powerful tools for standardizing entries. Here’s how to create and use them:
Creating a Template:
Click the down arrow next to the “New” button and select “New template.”
Name your template and set up the structure. For example, a bug report template might include fields for description, steps to reproduce, and expected results.
Using Templates:
When adding a new entry, click the down arrow next to “New” and select your template. The new page will have the preset format and properties.
Templates save time and ensure consistency across similar entries.
Managing Templates:
Edit, duplicate, or delete templates by opening the template menu and clicking the three-dot icon next to the template name.
Linking Databases
Linking databases allows you to connect data across different databases, enhancing the flow of information. Here’s how to use relations and roll-ups:
Creating Relations:
Add a new relation property to a database and select the database you want to connect to.
This creates a new column where you can link entries from the related database.
Using Roll-ups:
Roll-ups pull data from related databases. For example, calculate the total order value for a customer based on linked purchase entries.
Add a roll-up property, select the related database, choose the property to pull, and set the calculation method (e.g., sum).
Linked Databases
Linked databases allow you to display a database in multiple places with different views and filters:
Creating a Linked Database:
Place your cursor where you want the linked database, type the forward slash (/), and select “Create linked database.”
Start typing the name of the database to link and select it from the drop-down menu.
Customizing Linked Databases:
Apply filters, sorts, and views to linked databases without affecting the original.
This is useful for creating personalized views, such as a task list filtered to show only your tasks.
Conclusion
Notion’s advanced database features provide immense flexibility and power for organizing information. By understanding how to create, customize, and link databases, you can develop robust workflows tailored to your specific needs. Whether managing projects, tracking tasks, or organizing data, Notion’s databases help you stay organized and efficient. Explore these features and take your Notion skills to the next level!
Credits: this video is available on the YouTube channel Notion.